Blood Bight Knot
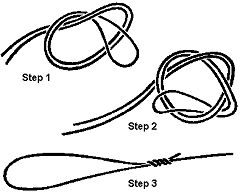
Another end loop can be tied quickly and easily using the Blood Bight Knot.
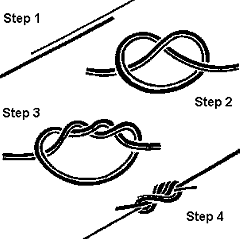
- Double the line back to make a loop of the size desired.
- Bring the end of the loop twice over the doubled part.
- Now pass the end of the loop through the first loop formed in the doubled part.
- Draw the knot up into shape, keeping pressure on both lines.
The Blood Bight Knot is often used for attaching a dropper when fishing deep water with several hooks.
Some anglers attached the hook directly to the end of the loop, which should be at least one-foot from the end of the line.
However, this is not a productive practice, when the fish are apprehensive. Far better to attach a single strand of nylon to a short Blood Bight Knot, using another Blood Bight Knot, or a Surgeon's Knot. |
|
|
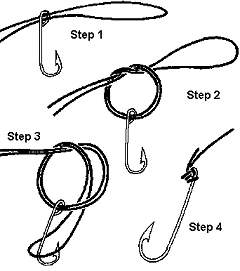
Clinch Knot
One of the most basic knots for adding end tackle, such as hooks, lures, or swivels.
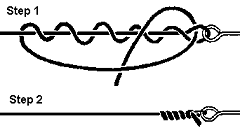
- Pass the line through the eye of the hook, or swivel.
- Double back. make five turns around the line.
- Pass the end of the line through the first loop, above the eye, and then through the large loop.
- Draw the knot into shape.
- Slide the coils down tight against the eye.
|
|
|
Double Turle Knot
Tied in monofilament nylon, the Turle Knot may slip unless another Simple Overhand Knot is made at the end of the line.
It is improved substantially by using the Double Turle Knot.
- Pass the line through the eye of the hook or swivel.
- Make two simple loops, and carry the line on to make a Simple Overhand Knot around both loops.
- Pass both of these loops over the hook or swivel.
- Pull on both parts of the line to draw the knot up into shape against the eye of the hook or swivel.
|
|
|
Dropper Loop
Another method of forming a loop, or loops, in the line above the sinker is to use a Dropper Loop, which that stands out at a right angle to the line.
The loops can be made long enough to have a hook set on them, but that isn't necessarily the best presentation for many fish.
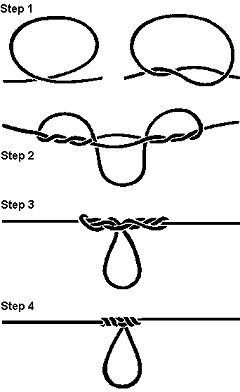
- Form a loop in the line.
- Take hold of one side of the loop, and make 6 or more turns around the line itself.
- This is the tricky part - keep open the point where the turns, or twists, are being made.
- Take hold of the other side of the loop, and pull it through the centre opening. use a finger in this loop so that it is not lost.
- Hold this loop between the teeth. Pull gently on both ends of the line, making the turns gather and pack down on either side of the loop.
- Draw up the knot by pulling the lines as tightly as possible. The turns will make the loop stand at right angles to the line.
|
|
|
Float Stop
The float fishermen who use a running float for casting use the Float stop to prevent the float from running up the line. This knot will move readily over the rod guides, but grip a monofilament nylon so tightly that it will not slide over the line.
It should be made with about 6 inches of nylon, usually the same diameter as the line itself.
- Take 2 turns (3 if necessary) around the main line at the chosen point.
- Bring both ends around to form a Surgeon's Knot (see above).
- Tighten into shape bringing the coils close together.
|
|
|
Loop Knot
A Loop Knot can be tied very easily under various circumstances, and attached to swivel and hook. It is a simple starting point for fishing knots. |
|
|
Palomar Knot
Palomar Knots provide another very simple knot for terminal tackle. It is considered to be the strongest knot for this application. It can be tied in the dark with a minimum of practice.
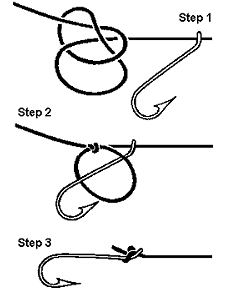
- Double about 10 inches of line, and pass through the eye.
- Tie an Overhand Knot in the doubled line, letting the hook hang loose. Avoid twisting the lines.
- Pull the end of loop down, passing it completely over the hook.
- Pull both ends of the line to draw up the knot.
|
|
|
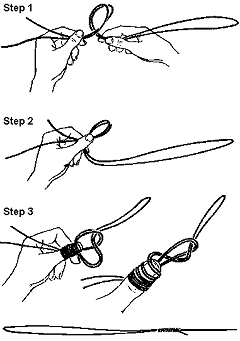
Spider Hitch
A double line can create an easier handle for a long fishing line and may be tied by means of a Spider Hitch
- Form a loop of the desired length, say 3-4 feet.
- Twist a section into a small loop.
- This is the only tricky part - hold this loop with thumb and forefinger, the thumb extending above the finger, and with the loop standing up beyond the tip of the thumb.
- Wind the doubled line around the thumb and the loop 5 times.
- Send the rest of the long loop through the small loop, and pull gently to unwind the turns off the thumb.
- The knot is now formed and worked into tight coils.
|
|
|
Surgeon's End Loop
Loops are made for the purpose of attaching leaders, traces or other terminal tackle. They have the advantage that they can be tied quickly even in the dark.
The Surgeon's End Loop is an easy way to go.
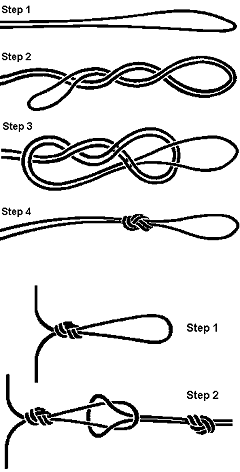
- Take the end of the line and double it to form a loop of the required size.
- Tie an Overhand Knot at the desired point, leaving the loop open.
- Bring the doubled line through the loop again.
- Hold the line and the end part together, and pull the loop to form a knot.
|
|
|
Surgeon's Knot
Surgeon's Knots may be used with two unequal diameter lines. It may be necessary to have one line on a spool to help pass it through the loop.
- Lay the two lines against each other, and overlap about 8-10 inches..
- Working the two lines as one, tie an Overhand Knot. It will be necessary to pull one line (say the leader) completely through this loop.
- Pull the leader through this loop again.
- Pass the other end through the loop.
- The formed knot can now be worked into shape.
|
|
|
Swivel Knot
This knot is used for attaching a swivel to a double line.
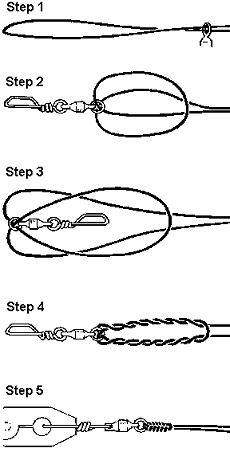
- Put the end of the double line through the eye of the swivel.
- Rotate the end half a turn, putting a single twist between the end of the loop and the swivel eye.
- Pass the loop with the twist over the swivel. Hold the end of the loop, together with the double, with one hand, and allow the swivel to slide to the end of the double loops that have formed.
- Continue holding the loop and the lines with the right hand. Use the left hand to rotate the swivel through both loops 6 times or more.
- Keep pressure on both parts of the double line. Release the loop. Pull on the swivel and loops of line will start to form.
- Holding the swivel with pliers, or (better still) attaching it with a short length of line to the rigging, push the loop down towards the eye while keeping pressure on the double line.
|
|
|
 Tucked Sheet Bend Tucked Sheet Bend
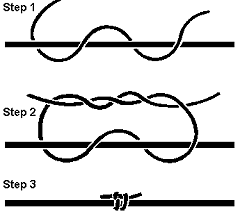
Usually employed by the fly fisherman, the Tucked Sheet Bend is commonly used for joining the backing line to the tapered line. It is not an especially compact knot, but has a very strong attachment, which cannot be said for the more aesthetically pleasing Perfection Loop.
- Make a Blood Bight (see above) at the end of the backing line.
- Take the end of the tapered line. Pass it through the Blood Bight and make a simple Sheet Bend.
- Now pass the end of the tapered line back through the closed loop of the Sheet Bend.
- Hold both ends of the tapered line to tighten and draw into shape.
|
|
Turtle Knot
The Turtle Knot is very simple to tie but is very weak.
It should not be used for light lines, and there are better knots for use with heavy ones. At least consider using the double turle trick listed below to enhance it, if you choose this simple knot.
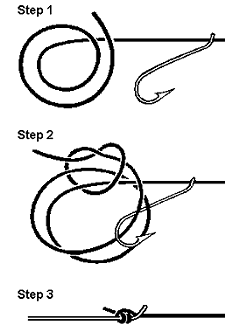
- Pass the line through the eye of the hook.
- Make a simple loop.
- Carry the end of the line on to make a Simple Overhand Knot upon the loop.
- Pass the loop over the hook.
- Draw up into shape.
|
|
|
Uni-Knot Version Of The Hangman's Knot
A join can between two lines of equal diameter can be made using one of the Hangman's Knots also known as a Uni-Knot.
This is a knot used for attaching the line to the spool of the reel.
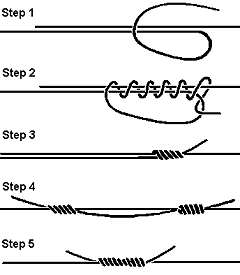
- Overlap about 6-7 inches of the two lines.
- Using one end, form a circle that overlies both lines.
- Pass the end six times around the two lines.
- Pull the end tight to draw the knot up into shape.
- Repeat the process using the end of the other line.
- Pull both lines to slide the two knots together.
|
|
 |
|


 Tucked Sheet Bend